Sifter: A non-invasive Roblox asset recovery tool
I have created a new tool for recovering Roblox assets based on the findings in my previous article. It is completely non-invasive as it relies on collecting data after it has left Roblox, instead of attacking the executable directly. This means that it is HIGHLY unlikely you will be banned for using this tool, and that it will continue working even with the new Byfron anti-cheat. It will continue functioning until Roblox completely overhauls its protocol to not rely on HTTP for asset transfer. Use this program as you would like (following GPL3 of course), but I don't assume any responsibility for unethical usage.
What can Sifter do and NOT do?
Sifter CAN recover the following assets:
- Images / Decals / Textures
- Sounds
- Text using the Localization Service
- Meshes
- Models(?)
Sifter CANNOT recover:
- Game Workspaces (e.g. terrain, game world, part locations)
- Scripts
Cool, what do I need?
You will need Wireshark (available for all platforms Roblox runs on) and basic intuition about your system's settings, as you will need to set environment variables for this software to work.
Why not use Wireshark directly?
While Wireshark can, in fact, recover Roblox assets by itself, the interface for doing so is clunky. Furthermore, it occasionally fails to catch all the received assets, and fails to handle multi-part and grouped asset downloads.
How do I use sifter?
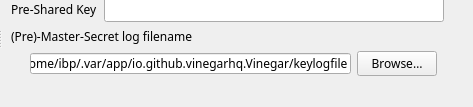
The process takes a few steps. First of all, we need to set the SSLKEYLOGFILE environment variable to tell the TLS library Roblox uses to dump the private key it uses. On Linux, you can prepend "SSLKEYLOGFILE=/filepath" before running Wine. If using Vinegar, you may add it under the [env] tag as seen below. On Windows systems, you will need to create a user environment variable. Following this guide from Oracle, you will need to create a "User Variable" with a Variable name of "SSLKEYLOGFILE" and a value of any accessible location where you would like the private keys to be saved.

After this step, you will want to open Wireshark (administrator privileges may be required), and navigate through the top menu. You will need to traverse the path "Edit > Preferences > Protocols > TLS", before you will be able to see a textbox called "(Pre)-Master-Secret log filename". Here, enter the filepath specified by your SSLKEYLOGFILE setting.
Once you have pressed OK to close the window, select the network interface you are using. Doing so will automatically begin capturing packets. At this point in time, you will be able to start a game on Roblox. Asset requests are actively made as you play, so hang around while Wireshark does its magic!
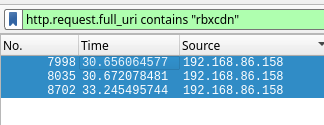
After some time has elapsed, it is time to harvest! At the top of the Wireshark page is a text box; that field is where you can enter the filter 'http.request.full_uri contains "rbxcdn"' to only display asset captures.
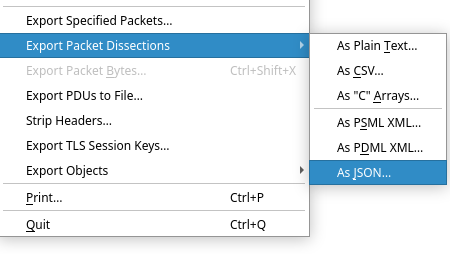
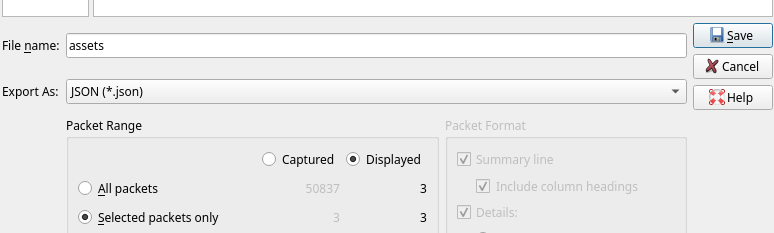
After you have filtered the results, select all entries and right click them to open the context menu. There, you can export the packets (JSON TYPE ONLY) under a filename of your choice (see images).
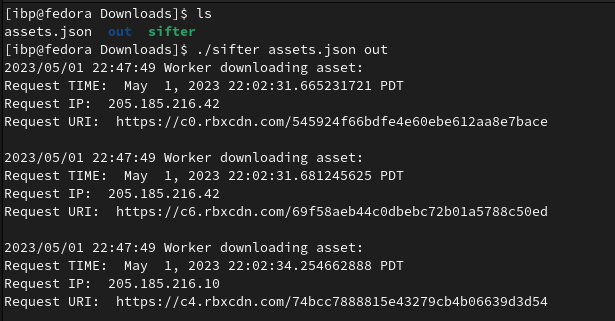
Once you have created the JSON, use the sifter executable with the JSON as your first argument and an output location as your first arguument. Sifter will automatically resolve requests to their original URLs and download the assets.
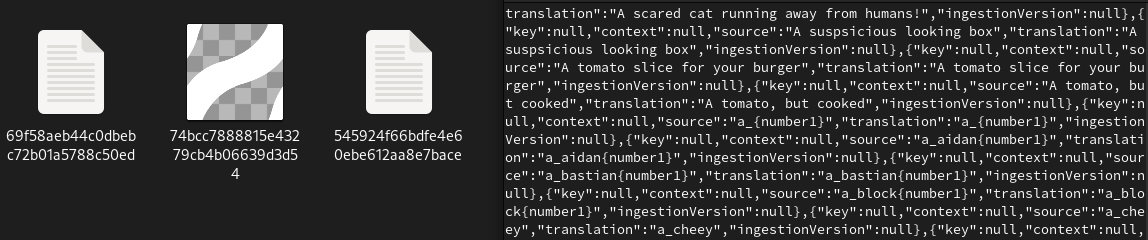
Finally, you can view the files in the target location.
 HAPPY HACKING!
